Android is a collection of softwares for mobile devices that includes an operating system, middleware and key applications. The Android SDK provides the tools and APIs necessary to begin developing applications on the Android platform using the Java programming language.
Android Features:
1. Application framework enabling reuse and replacement of components
2. Dalvik virtual machine optimized for mobile devices
3. Integrated browser based on the open source WebKit engine
4. Optimized graphics powered by a custom 2D graphics library; 3D graphics based on the OpenGL ES 1.0 specification (hardware acceleration optional)
5. SQLite for structured data storage
6. Media support for common audio, video, and still image formats (MPEG4, H.264, MP3, AAC, AMR, JPG, PNG, GIF)
7. GSM Telephony (hardware dependent)
8. Bluetooth, EDGE, 3G, and WiFi (hardware dependent)
9. Camera, GPS, compass, and accelerometer (hardware dependent)
10. Rich development environment including a device emulator, tools for debugging, memory and performance profiling, and a plugin for the Eclipse IDE
Android Architecture:

Android applications are written in the Java programming language. The compiled Java code — along with any data and resource files required by the application is bundled into an Android package, an archive file marked by an .apk suffix.
Sample Application:
The sample application that I am going to use is a Simple Interest Calculator that I had built when I started with Android Application Development. I intend to explain beginners about android application development using this application.
Environment Setup:
Android Application Development starts with setting up environment for android application by following the steps mentioned in the android developer site.
The steps below provide an overview of how to get started with the Android SDK.
1. Prepare your development computer
You may need to install the JDK (version 5 or 6 required) and Eclipse (version 3.4 or 3.5, needed only if you want develop using the ADT Plugin).
2. Download and install the SDK starter package
Select a starter package for android sdk and download it to your development computer. To install the SDK, simply unpack the starter package to a safe location and then add the location to your PATH(if windows).
3. Install the ADT Plugin for Eclipse
If you are developing in Eclipse, set up a remote update site at https://dl-ssl.google.com/android/eclipse/ under Help -> Install New Software -> Add. Install the Android Development Tools (ADT) Plugin, restart Eclipse, and set the "Android" preferences in Eclipse to point to the SDK install location.
Note: If the above mentioned link doesn't work then just replace https with http.
4. Add Android platforms and other components to your SDK
Use the Android SDK and AVD Manager, included in the SDK starter package, to add one or more Android platforms (for example, Android 2.0 or Android 2.2) and other components to your SDK. Preferably just download the latest of the lot. You can also download the documentation for the version of Android you are downloading.
To launch the Android SDK and AVD Manager on Windows, execute SDK Setup.exe, at the root of the SDK directory. On Linux, execute the android tool in the/tools/ folder which would be " /tools/ sudo sh android "
Once you setup thee environment for android application development you can start by creating a sample project by creating an Android Project using Eclipse IDE as shown in below figure:
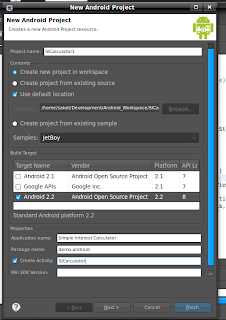
The fields that are shown here have a specific meaning attached to it.
To launch the Android SDK and AVD Manager on Windows, execute SDK Setup.exe, at the root of the SDK directory. On Linux, execute the android tool in the
Once you setup thee environment for android application development you can start by creating a sample project by creating an Android Project using Eclipse IDE as shown in below figure:

The fields that are shown here have a specific meaning attached to it.

Lets now discuss the folder structure because I feel it would help you in segregating your resources for the application in a proper way.
3. drawable:
There are 3 folders for storing images based on the resolution sizes of the screens of mobile phones.
4. layout:
This folder consists of a single xml file initially defining the layout configurations.
5. values:
This folder holds a xml file named strings.xml file. This file maps values of ID's with string values. This topic will be discussed later in the tutorial.
6. AndroidManifest.xml:
This is the main configuration file for the whole of android application. It defines the way your application will be launched, the number of activities present in your application, the permissions that your application has, etc, etc..
7. default.properties:
This file is generally used for localization purposes.
Now, lets start the tutorial with the main.xml file which configures the layout of our application.
Layout terms that will be used are very similar to Java SWING components.
1. LinearLayout:
A layout that arranges its children in a single row or column. It has some attributes like orientation which specifies whether the layout will be single row or column.
2. Button:
It specifies a single button.
3. EditText:
This corresponds to a editable textbox field where a user can enter data.
4. TextView:
This tag corresponds to a Label field.
Android offers 2 kinds of layout design, XML layout, UI layout which is provided by ADT. I prefer XML layout because I am used to it and UI layout development is a bit jerky as of now and needs a lot of improvement.
Using the above tags I have written the layout of this demo application in main.xml which you can refer from http://code.google.com/p/simpleinterestcalculator/
Now lets get to the java part of android application development.
Here I have created only one java class for performing an operation. As the application becomes complex we can have multiple java classes performing operations.
1. Activity:
Activity in android terms is nothing but a screen window. We extend our class with Activity because we need a single screen window for having a UI for the application and shown to the user. When you want to perform different actions or have multiple screens application then you need to have separate java classes extending Activity class for each of the screen windows.
public void onCreate(Bundle savedInstanceState) {
super.onCreate(savedInstanceState);
setContentView(R.layout.main);
When you create a new android project, these are the 3 lines of code that will be automatically generated by the Eclipse IDE for you.
1. onCreate() method is the method that gets invoked when your application starts.
2. It calls the super onCreate() method to set initial parameters of the screen window which is referred as Activity class.
3. setContentView(R.layout.main) initializes the screen layout with main.xml.
We have the layout set for our application. Now our job is to find a way to refer to the UI elements on java side. To accomplish this we have a method named findViewById(), this gets the UI element based on the ID that we assign to each UI component while designing the layout in main.xml.
Ex: messageBox = (Button)findViewById(R.id.box);
You can refer to the code from http://code.google.com/p/simpleinterestcalculator/. In this example :
1. We get the reference of Calculate button because we perform action only on click of the button.
2. We assign an OnClickListener() to the button which catches the event of CLICK of the button and makes the user override the onClick() method of the listener.
3. We perform the basic validations of the fields of the EditText elements for NULL value.
4. We use the wrapper class of Double to convert the string values to their actual Double values.
5. If any error occurs then we show the user a Toast message which is nothing but a display of a pop up message telling the user about the error.
6. If all the validations holds good then calculate the simple interest from the formula and display it in a Alert dialog box showing the calculated interest. Syntax that needs to be used to show the AlertDialog is:
AlertDialog.Builder alertbox = new AlertDialog.Builder(v.getContext());
// set the message to display
alertbox.setMessage("Simple Interest = "+si.toString());
// add a neutral button to the alert box and assign a click list alertbox.setNeutralButton("Ok", new DialogInterface.OnClickListener() {
// click listener on the alert box
public void onClick(DialogInterface arg0, int arg1) {
// the button was clicked
Toast.makeText(getApplicationContext(), "Thank You !!!!", Toast.LENGTH_LONG).show();
}
});
// show it
alertbox.show();
I have also created a screen cast of this application which you can refer and get to know how the application works.
This was a very basic overview of Android Application Development using a basic example but "There is a lot more to Android That Meets The Eye", for more information on android and demo applications you can refer to the following links:
References:
Groups: